Making Time for What Matters Most

At Once A Month Meals, we are all about making time for what matters most using freezer cooking.
Our goal is to help you make meal plans with delicious and freezable recipes ahead of time, so you have more time in your life for what matters most to you. Can we get an amen?!
We all want to spend less time cooking and feeding our family, and more time actually spent WITH our family.
Therefore, in the spirit of enabling you more time with your family through our freezer cooking membership, we want to help make suggestions on how you can enjoy that extra time!
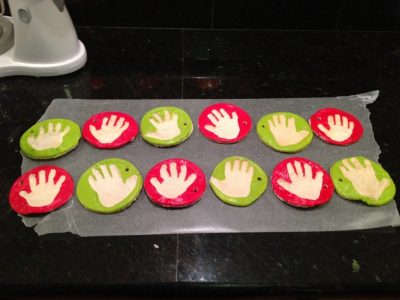
Homemade Handprint Ornaments
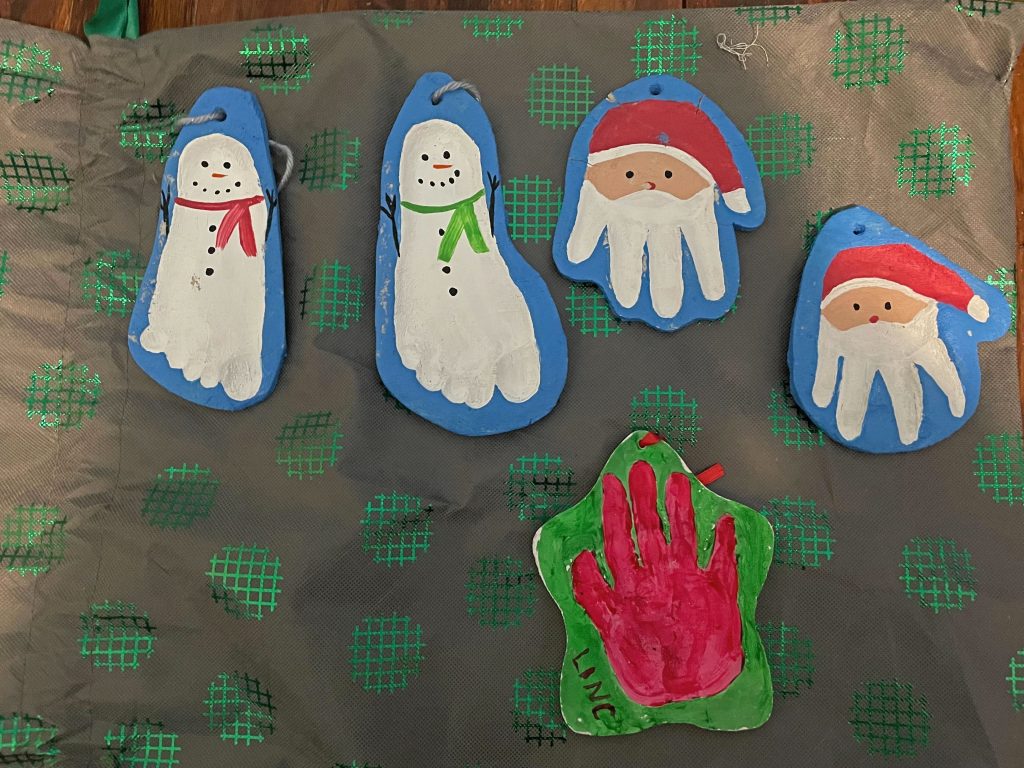
These adorable ornaments have evolved over the years and thanks to awesome idea sites like Pinterest we keep getting more creative each year! It means so much to family and friends to receive a heart-felt, homemade gift from kids (or even pets), so check out these creative ideas or feel free to add your own and let us know what they are, we love hearing from you! These also make a great homemade handprint keepsake!
You can also make these for Mother’s Day, Father’s Day, Grandparent’s Day, Christmas, Teacher Appreciation and so much more! Everyone will love receiving your homemade handprint ornaments as a gift this year!


Ingredients:
- 1 cup flour
- 1/4 cup salt
- 7 tbsp water
- Round cookie cutter (I used a drinking glass instead)
- 1 drinking straw
- Craft paint
- Ribbon
Directions:
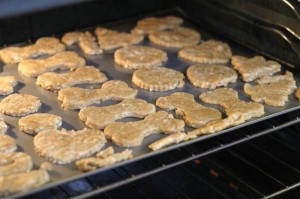
- Preheat oven to 300°F.
- Mix together flour, salt, and water.
- Knead for 15 minutes (or use the dough hook on your stand mixer – so easy!).
- Roll out the dough to no more than 1/4-inch thick, then use the cookie cutter (or glass) to make rounds.
- Press the child’s hand into the dough. (TIP: If you’re doing this with really little ones, you may have to go back and make deeper impressions of their hands with your fingers or a kitchen utensil–the deeper the impression, the better your ornaments will turn out!)
- Use a straw to poke a hole in each ornament (this is where the ribbon will go later).
- Place on a baking sheet and bake for 40-45 minutes, until golden.
- Wait for ornaments to cool, then paint as desired and thread a ribbon through each straw hole to create ornament hangers.
Servings:
1 batch will yield approximately 6-8 ornaments.
Adapted from this recipe.
If you enjoyed this homemade, heartfelt gift, you might also enjoy this one! It’s for our furry friends! As a staff we love the furry members of our OAMM family as much as our human ones! We have both feline and canine varieties and through the years have had reptiles as well! Check out this post about making dog bones to give as a gift or to surprise your own beloved companion. 
Other Holiday Resources to Keep You Cooking!


121 Comments
Join the discussionI did this exact thing with my kids! Here is ours! http://livelearnlove226.blogsp…
Great idea! I just tried it & after my ornament was placed in the oven, the flour rose & made the handprint disappear 🙁 do you have any suggestions for me?
Oh no!! Sorry Angie! I’m not sure what happened my thought maybe it was self rising flour?
I have tried this twice now and both times I had the same problem with them rising and the hand prints disappearing. I made sure I did not use self-rising each time. Not sure what I am doing wrong? This is such a cute idea for the kids to do, hate they keep not turning out.
I just did this with my preschool class and like 3/10 did the same thing – rising and erasing the handprints. I accidentally broke one of them to find it hollow, which means the issue here is air bubbles. Make sure you knead that dough!
Angie,I had the same problem last night. Have you found any solutions. I was so dissapointed!
Try cooking them at a lower temp (200) for a longer time (about an hour). I can’t explain the science of why this work, but lower and slower cooking seems to do the trick.
Before putting in oven put glue on the hand print
I just tried this, my pre baking prints were beautiful but once they went into the oven they puffed up really bad and the prints disappeared. Is there a trick that I’m missing??
I’ve been doing these for years and i just let them air dry it takes a few days though
I think the puffing up problem may have to do with how long the dough is kneaded. 15 – 20 minutes is quite a stretch of time in the real world and if youre anything like me, I only knead my for about 5 minutes….. what happened? Puffy ornaments! Next batch I will kneaded for the full 20 minutes.
the temp is entirely too hot.. 300 is NO good.. must be 200 for 1-2 hours. lord.
I did one tonight ..
1 cup flour
1 cup salt
I added water little by little,
And flour until it stopped being sticky and was good to mold,
Preheat oven to 170 left it in for 4 hours. It came out perfect.
i made the Christmas tree ornaments try poking a few holes with a tooth pick it will stop the puffing cause it will cook right threw without fluffing up
I made some for Christmas. I never baked it. I put it on wax paper and let it dry. Then flipped over for other side to dry. Perfect! Didn’t ruin my kids prints.
How many days it takes for air dry
mine just did this too, and i’ve realised, you must be referring to 200F, not 200C which is what we use here in Australia. I dont want to risk another one puffing and browning, so i’m just going to let it air dry for now. we have 4 days until my daughter sees her dad for fathers day
Hi. I would recommend all purpose flour so it does not rise. ?
I used all purpose flour and mine is rising too. I just checked and they are puffy. I am disappointed as it took me along time to get it to a good consistency so it would be sticky. They are still cooking as I read this so I turned he temp way down. Maybe not too late
That happened to a friend of mine. She used self rising flour.. she got plain flour and it worked great.
Are you using self rising flour? Use an all purpose flour
Thank you! I have been looking for something like this. Now i have a craft for my almost 1 month old and christmas gifts 🙂
Great idea! I remember my boys making ornaments a few years ago and they added some ground clove to the dough. They still smell good, too!
I did this last night with my kids – huge success! http://child-bearing-hips.blog…
Did this last night with my girlies! Love it!http://janetsmith0718.blogspot…
I did this tonight with my kids. I baked them for a full hour but they were still a bit soft. They puffed up through the center and when I look at the bottom its basically a big concave doughy bowl in the middle. I’m not sure if it would be ok to put them back in or not.
Tara – Mine were a little soft on the back as well, but I just let them sit on a cooling rack overnight and they dried out.
I just got a 9 week old puppy and did this with him so I can remember his puppyhood lol love it
I just added a few drops of food coloring and some glitter to the flour mixture and it turned out so great, since my girls are not old enough to paint them.
Are they terribly fragile? I want to ship these to out of state family and friends as gifts, but don’t want them to break on the way there!
If you make them thick they’re pretty hard. If you bubble wrap them and send them they should be just fine.
Do i have to bake them immediately? i teach a preschool class and want to do them at class then take them home to bake them?
Danielle, I think they could dry out a little but not too bad. You could do a test one and see how it does first.
So I ran out of salt at my house, will this work without salt or can I use seasoning salt? My 4 year old was looking forward to doing this & was heartbroken when I told him we had no salt.
I was wondering how long these last? Thought it might be cute to make new ones every year and decorate tree with all the handprints from years past.
They definitely last over a year. I can’t tell you if they last 20 yet 😉
My daughter did one in Kindergarten and she is 50 this year and I still have it in good condition. It also has been moved over 18 times and not a crack in it. 🙂 It’s a nice keepsake. Wish I had one for my son.
That’s SO sweet Marcy!
Thank goodness! I want to keep my dobies ‘ paw prints for at least as long as I live. It m 52 now, so about 35 years?
If you seal it they will last forever. Just a gloss coat of clear paint or what every they call it. My mom did these when I was a baby it has lasted over 30 years
If you have dogs keep the ornaments where they can’t get to them. We got our first one of our first grandson’s hand print. I hung it on the wall but my yorkie could reach it when he stood on the back of the couch. He ate it. LOL!!
I can tell you they last for well over 20 years. When I was a child, we made these in daycare. I am almost 30, and I still have mine. Your idea will work beautifully! 😉
This recipe is great! Much better than the baking soda corn starch recipe I found. What sort of craft paint did you use? It looks shiny which I like. I have some acrylic, will the ornament soak it up though?
Dana, I haven’t personally made them yet, but I don’t think the acrylic will soak through that badly. I think Jimmie used a basic craft paint.
Thanks for sharing. Now I wish I had a mixer to knead the dough.
I’m sure these will do just fine if you let them air dry. Put them on a rack to dry. It will just take longer than bakig them, but it would alleviate the “rising” in the middle
Mine rose a little too but took them out and pushed them back down and poked a few little holes in them and reduced heat to 200 F an baked for two hours. My concern is they still feel a little soft I’m going to put them bake in the over and let air dry for a few days before painting.
How did that work? I did the same thing and figured I’d let them sit overnight… Its only been a couple of hours though…
Well I live in a dry climate (Colorado) so it helped. I honestly forgot about them for a day or so and they were totally dried out.
I can’t wait to do this art project with my 4 yr old daughter and 5 and 3 yr old nieces. But I’m a little concerned about the rising issue. I read all the posts, but didn’t see any solutions. Nina wrote something about it a few lines up, but I’m not sure if she was talking about not having salt in the recipe, or using a mixer to knead the dough. Maybe I will try Victoria’s method: lower the heat and extend the baking time 🙂 Wish me luck.
Could you do this with other cookie cutters and not just handprints???
yes you could!
I have a great tip!!!!!! After you bake these off and they cool, Paint with Elmers glue then sprinkle with glitter. Shake off excess it will look amazing hanging from your tree!
I grew up making salt dough ornaments with my mother, and this year I finally get to make them with my new son! A tip for the dough is to add maybe two drops of hand dishwashing liquid. It helps sticking and also I think to help keep the dough from rising. You can also try adding more salt to the dough. Bake them low and slow.
What a great tip Stacey!!
I just made this for some relatives for Christmas. Since my kids have big hands, I simply rolled out the dough, and baked it at 250F for an hour. I had no puffing and no rising (I just used regular flour). What I did notice though is the thinner you make the ornaments, the better the handprints turn out. But they all look fabulous!
Wow.. this is such a cute idea. I know Christmas is far away but I am going to try this soon for some occasion with my 2 years old.
Do you paint them after they have dried, or do you mix in the paint or food coloring with the mixture and then do the handprint? Also, can they just be air dried?
I paint them after they have dried. You can dye the dough if you’d like but I like to paint mine afterward. You can air dry them but it will take significantly longer.
I wonder if putting them in the dehydrator would solve the puffing problem?
I made something similar to this yesterday and I can’t get them out of my Pyrex. I tried putting them in the freezer to see if that would pop them out kind of like a candle. Didn’t work. Any ideas?
Hmm not sure Jamie! Maybe try using a scraper to pop them up?
This was an epic fail. The dough was so sticky that it just stuck to her hand when she tried to lift her hand up. We followed the directions to a tee. What did we do wrong?!
I’m sorry Kari!! I have no idea what happened, my thought would be that you could need to add more flour?
Just add flour until the stickiness is gone..
i just made 3 with my daughter and the first one came out good the second one came out puffy and lost some of the prints of her foot and toes and fingers haven’t put the 3rd one in yet so i dont know what i did differently
I made these yesterday. I started with my oven at 300…but then read the comments and turned it down to 200. They came out perfectly! Now I just have to decide how I’m going to have the kids I nanny paint them…hmmm…LolAwesome Christmas present for them to give to their parents!
Look at you being the early bird with Christmas presents! Want to help me figure out my list now? 🙂
I tried making these. They turned out pretty good, but are too heavy to be ornaments. How can I make them lighter?
Hi Kristi, I think maybe if you roll them out thinner it would make them lighter next time.
A trick I was told to keep the dough from puffing up is to put very small holes into the dough so that the air escapes. Be careful with the holes though because they can show up when you bake them if they are to big. My friend said that she used a bow or small decoration to cover her holes. It is something to play with. She has used this reciped for designs other than handprints also.
Is there anyway you can do this with out salt?
Hi Alexa, I don’t think the dough will set right without the salt. You might could try a different kind of salt but I think it will need some kind. If you try it without and it works, let us know!
We are going to do this but we are going to make the circle pattern bake then paint them, then paint the kids hands and plant on them…. Because we will be doing this as a class project at school….
That’s a super idea
I just made these and they came out perfect. I didn’t knead the dough for the required 15 minutes either. I was worries when I read the other comments, but I didn’t have the same problems.
okay guys! im about to try this with my 18 month old….i really hope it turns out good!
I want to make these but turn hand prints into santa faces. my problem is I do not have access to any types of paints other than crayola washable paints.and latex housr paints. I do have clear varnish to seal them. will this work?
The dough rises when you make them too thick. Try rolling the dough thinner.
Loved this! Did hand & footprint ornaments with my 2 month old & it worked great! The dough was pretty sticky so I added some extra flour & that helped. I baked at 200 for 40 minutes and then ended up flipping them over & baking another 20-30 minutes because the back was still pretty soft.
Could you add cinnamon to these to help them smell good? And if so how much would you recommend adding? Thanks 🙂
You could! I would say no more than 1-2 tsp. Have fun!
I made these with my 3 month old and they came out great. I used nonstick butter and a spatula to put the molds on his feet. Came right off the spatula and didn’t mess up the design. I know it sounds weird but really works. Maybe that will help 🙂
Oh wonderful!! Thank you so much for sharing! We’re glad to hear yours turned out great!
I want to do this for a class project, but I don’t have an oven…can I let it dry over the weekend??
Yes, they will just take longer to dry (aka – it really make take them all weekend to dry!). Enjoy 🙂
I did this with my toddler class at church and we had them rub extra flour on their hands so that it wouldn’t be quite as sticky!
So smart!! Thank you for sharing this!!
Does it matter what flour you use??
We recommend all purpose flour but no, it shouldn’t matter what type of flour you use.
New to this, do you mix flour, salt and water by spoon then take it out of bowl and knead it
Hi, Deb!I like to either just dive in with my hands to mix it since I’ll be kneading it after. You could use a spoon but I know my hand kinda cramps up. A stand mixer would be another easy way to go though if you have one.
I did this craft with my daycare kids for Mother’s Day gifts but both the brush on acrylic sealant and spray on acrylic are created an immediate peeling effect. It would not absorb. It formed a film over the top and peeled off. We made these the last week of April so i know they were completely dry. What do you think I did wrong and what can I use in place of the original suggested sealant?
I wouldn’t use acrylic sealant or spray. If you want to paint, you can use acrylic paint, otherwise, I would just leave as is. Hope that helps!
Great idea but how do u persevere this without getting eaten by any insects.once I did and after some days some tiny creatures started eating it 🙁
Oh, that’s strange! We’ve never run into that.
Do you spray it with varnish or something after it is finished?
No, one of our staffers has used paint, and the paint has held up well.
I did this just added extra flour annd after cutting out the circle i pressed down and about 5 times of pressing in the hands just to deepen the prints. Put it in the oven at 350. 10 mins on the back and carefully flipped it to the print side so it would cook with the impressions instead of making them disapear. Mine were hard and done in a matter of 15 mins!
what spray do u have to use when u do this as we are making them as xmas present for family and i wont to be able to het it right as our son dont like beeing fusst over so we cant stuff around to much
You shouldn’t need any type of spray for this. You can use craft paint to paint them after baking if desired.
Tried these for the very first time today and they turned out so well, I was surprised how well it worked so thank you. Did everything as it said. I am in the UK and literally used 1 tea cup as a measure and plain flour then baked on 150 C for 40mins. Didn’t brown at all, just dried out nicely and stayed white ready to paint tomorrow. The straw trick works perfectly too.
Awesome! So glad they turned out well for you!
Heres a better explaination. With tips. https://www.thebestideasforkids.com/salt-dough-handprint-ornament/
I found a recipe that worked better for me – 2 cups flour – 1 cup salt – 1 cup water.
I added a 1/2 cup of water, mixed the dough and used food coloring to make them tie die. It only made 2 ornaments but I used his feet. My 9 month old son wears 2T shoes (lol) so it could make a few more for smaller babys. But it came out perfect!
Awesome idea with the tie die Jessica! Glad they turned out well for you!
it is not working for me at all followed what was written and nothing gave up doing it this way will try some other way
Hi Kristine, I’m so sorry this didn’t work out for you. Thank you for your feedback. Some tricks people have tried successfully are turning down the oven temp or letting them air dry. ~OAMM
What a fun idea! I’m going to share this with my friends who have children.
I was reading on another instructual, it said to bake at 100 degrees for 3 hours. That will prevent it to rise while baking.
I just made these with my grandchildren. Ours turned out great. We had so much fun that they decided to make other ornaments. Thank you for the recipe.
im doing these now with my grandsons ingredients
1 cup flour
1 cup salt mix together in bowl
i ran out of salt so i used kosher salt and it worked
mix those first then spread the middle to make a hole and added 1/2 cup of warm water
mix it all together then rolled it into a ball put it on a cookie sheet and rolled it out with rolling pin and put my grandsons hand on it and pressed down for the imprint helped him pick his hand up and put in oven
preheat oven to 200 degrees keep in for 1 hour or until dry take out and let cool then decorate.
I’ve always air dried! Takes a few days, but no problems with puffing!
Make them a little bit thicker and it will work. 🙂 just made mine.
We made these in 2011. I just checked on them and they are cracking pretty bad. Any suggestions to preserve or somehow redo the print without messing it up or losing it? Thanks.
Hi Courtney, I’m sorry to hear that your ornaments have cracked over time. You could try a sealer spray or even mod podge to help with the cracking of the ornaments to help preserve them.
After reading the comments, I took the advice of several.
I made sure I mixed it for the full amount of time, then lowered the temp to 200°
They’ve been in the oven now about 30 mins and drying nicely. No cracks or puffing.
Awesome to hear!
10/10 would not recommend. I had to 1/2 flour extra. And even then the dough was sticky. I also had to cover it in flour before I made the impression so it didn’t stick to my daughters hand.
Hi Kristina! Sorry to hear this wasn’t a good experience but we’re glad that you were able to make it work. Thanks for your helpful suggestions for others!